Climate Control Project
Project Overview
This project shows how to control a DHT22 via ESPHome. You can integrate it with Home Assistant.
Step-by-Step Guide
- Wire the AM2302(dht) to your ESP32/ESP8266 board.
- Upload the ESPHome YAML configuration.
- Add the device to Home Assistant for remote control.
Build hardware
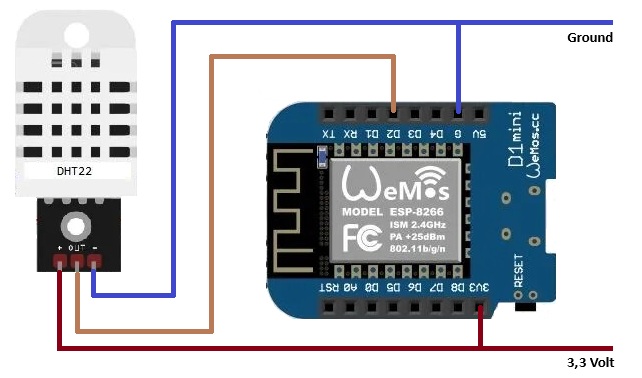
First we wire the hardware, in this case we use a WEMOS D1-mini with a DHT22
ESPHome YAML
esphome:
  name: livingroom_sensor
  platform: ESP8266
  board: d1_mini

wifi:
  ssid: "MyWiFi"
  password: "MyPassword"

sensor:
  - platform: dht
    pin: D2
    model: DHT22
    temperature:
      name: "Living Room Temperature"
    humidity:
      name: "Living Room Humidity"
    update_interval: 10s
Breakdown:
- esphome: Defines the device name, platform, and board type.
- wifi: Your WiFi SSID and password for network connection.
- sensor: Configures a GPIO pin to control a DHT22, you can see the result in Home Assistant.
wifi:
  ssid: !secret wifi_ssid
  password: !secret wifi_password
  min_auth_mode: WPA2
WiFi Configuration Explained:
- ssid: The name of your WiFi network, stored securely in the
secrets.yamlfile. - password: The password for your WiFi network, also stored in
secrets.yaml. - min_auth_mode: Sets the minimum authentication mode; WPA2 is recommended for security.
Using !secret keeps your sensitive WiFi credentials out of the main configuration file, which is a best practice for ESPHome projects.
sensor:
  - platform: dht
    pin: D2
    model: DHT22
    temperature:
      name: "Living Room Temperature"
    humidity:
      name: "Living Room Humidity"
    update_interval: 10s
What each line means:
- platform: dht – Uses the DHT sensor platform.
- pin: D2 – The GPIO pin where the sensor's data pin is connected.
- model: DHT22 – Specifies the sensor type (DHT22 / AM2302).
- temperature → name – The name that appears in Home Assistant.
- humidity → name – The humidity reading name in Home Assistant.
- update_interval: 10s – Reads the sensor every 10 seconds.
This project is built using ESPHome and integrates seamlessly with Home Assistant.
Frequently Asked Questions
Can I use this project without Home Assistant?
Yes, ESPHome can run standalone and output data via serial or API.
Does this project work without OTA?
Yes, the firmware is uploaded via USB and runs locally.
Which ESP boards are supported?
ESP8266 and ESP32 boards are supported.