
Smart Neato Project
Project Overview
When Neato discontinued their cloud services, many perfectly functional robot vacuum cleaners suddenly lost their smart features. This project was born out of that frustration. In this blog post, I’ll show you how to bring a Neato robot vacuum cleaner back into Home Assistant using ESPHome — completely independent of the cloud.
This was not a plug-and-play solution. It required a lot of research, trial and error, hardware tinkering, and quite some evenings of debugging before everything worked reliably. The goal of this guide is to save you that time and help you keep your Neato cleaner useful for years to come.
If this project helps you, or if you appreciate the effort that went into documenting everything step by step, consider supporting my work by buying me a coffee ☕. Your support is greatly appreciated and helps motivate me to keep sharing projects like this.

Step-by-Step Guide
- Connect the ESP board to your Neato.
- Upload the ESPHome YAML configuration.
- Integrate the device with Home Assistant.
Materials
- In this example I used a wemos d1 mini.
- Neato D7.
- Four wires.
- Optional: 3D printed housing
Project Images
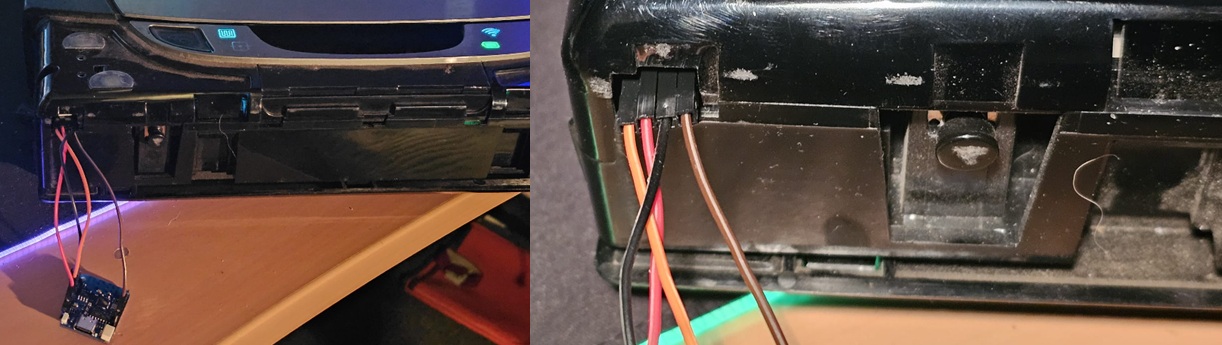
Locating and Connecting the Neato Serial Port
The connection we need is located behind the front bumper of the Neato. To access it, you first have to remove the bumper. This can be done by gently pulling the sides of the bumper slightly outward, after which it can be removed.
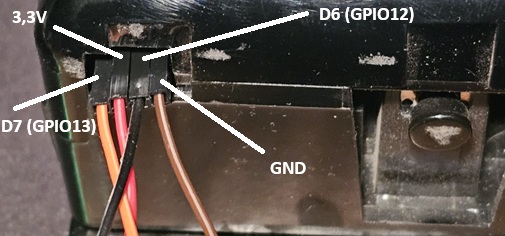
Once the bumper is off, you will find a 4-pin connector on the left side. This is the connector we will use for this project.
Neato Pinout (Right to Left)
Looking at the connector from right to left, the pin functions are as follows:
- GND
- TX
- 3.3V
- RX (leftmost pin)
Connecting to the Wemos D1 Mini
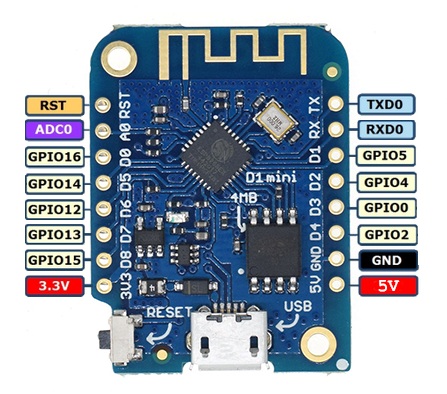
The pins can be connected directly to the Wemos D1 Mini as follows:
- Neato 3.3V → Wemos 3.3V
- Neato GND → Wemos GND
- Neato TX (2nd pin) → D6 (GPIO12)
- Neato RX (4th pin) → D7 (GPIO13)
⚠️ Important Note
Do not connect the Neato 3.3V pin while programming the Wemos D1 Mini via USB.
Only connect the Neato’s 3.3V supply after the ESP has been fully flashed and the USB cable is disconnected. This prevents potential power conflicts or damage.
Before You Start: ESPHome & Home Assistant Basics
If this is your first time working with ESPHome and Home Assistant, it is highly recommended to start with the basics before continuing this project. This guide assumes basic knowledge of ESPHome, flashing ESP devices, and Home Assistant integrations.
The following tutorials will help you get up and running quickly:
ESPHome Neato Sketch
⚠️ This configuration is written for ESPHome version 2025.11.2. Please update the code if you are using a newer or older version.
To get started, create a new device in ESPHome as an empty project and paste the following code into the project.
Make sure you create the secrets for the passwords or rename them directly in the code. This ensures your WiFi credentials and other sensitive information remain safe.
For more details on how to configure WiFi in ESPHome, see our guide: First Project – WiFi Configuration Explained
esphome:
  name: neato
  on_boot:
    priority: -10
    then:
      - script.execute: boot_actions

esp8266:
  board: d1_mini

wifi:
  ssid: !secret wifi_ssid
  password: !secret wifi_password
  ap:
    ssid: "Neato Fallback Hotspot"
    password: !secret hotspot_password

logger:
  level: INFO

api:

ota:
  platform: esphome
  password: !secret ota_password

uart:
  id: neato_uart
  tx_pin: D7
  rx_pin: D6
  baud_rate: 115200

text_sensor:
  - platform: template
    name: "Neato UI Version"
    id: ui_version
  - platform: template
    name: "Neato Vacuum Power"
    id: vacuum_power
  - platform: template
    name: "Neato Vacuum Power Eco"
    id: vacuum_power_eco
  - platform: template
    name: "Neato Wall Sensor Type"
    id: wall_sensor_type
  - platform: template
    name: "Neato Wheel Pod Type"
    id: wheel_pod_type
  - platform: template
    name: "Neato Raw UART"
    id: raw_uart
  - platform: template
    name: "Neato Battery Voltage"
    id: neato_battery_voltage

button:
  - platform: template
    name: "Find Neato"
    icon: "mdi:map-marker-radius"
    on_press:
      - uart.write: "PlaySound SoundID 1\n"

  - platform: template
    name: "Start Cleaning"
    icon: "mdi:robot-vacuum"
    on_press:
      - uart.write: "Clean House\n"

  - platform: template
    name: "Spot Cleaning"
    icon: "mdi:robot-vacuum"
    on_press:
      - uart.write: "Clean Spot\n"

  - platform: template
    name: "Stop Cleaning"
    icon: "mdi:stop-circle"
    on_press:
      - uart.write: "Clean Stop\n"

# Dropdown voor schoonmaakmodus
select:
  - platform: template
    name: "Cleaning Mode"
    id: cleaning_mode
    options:
      - "Normal"
      - "Gentle"
      - "Deep"
      - "Quick"
    optimistic: true
    on_value:
      then:
        - lambda: |-
            if (id(cleaning_mode).state == "Normal") {
              id(neato_uart).write_str("StartCleaning Normal\n");
            } else if (id(cleaning_mode).state == "Gentle") {
              id(neato_uart).write_str("StartCleaning Gentle\n");
            } else if (id(cleaning_mode).state == "Deep") {
              id(neato_uart).write_str("StartCleaning Deep\n");
            } else if (id(cleaning_mode).state == "Quick") {
              id(neato_uart).write_str("StartCleaning Quick\n");
            }

interval:
  - interval: 1s
    then:
      - lambda: |-
          static std::string buffer = "";
          uint8_t byte;
          while(id(neato_uart).read_byte(&byte)) {
              if (byte != 0x1A) {  // negeer escape byte
                  buffer += static_cast(byte);
              }
          }

          if (buffer.length() > 0) {
              size_t start = 0;
              while (true) {
                  size_t pos = buffer.find('\n', start);
                  if (pos == std::string::npos) break;

                  std::string line = buffer.substr(start, pos - start);
                  // filter non-printable characters
                  line.erase(std::remove_if(line.begin(), line.end(),
                                            [](char c){ return c < 32 || c > 126; }), line.end());
                  if (line.length() > 0) {
                      ESP_LOGI("neato", "UART LINE: %s", line.c_str());
                      id(raw_uart).publish_state(line.c_str());

                      if (line.find("UI Version") != std::string::npos) {
                          id(ui_version).publish_state(line.substr(line.find(",")+1).c_str());
                      } else if (line.find("VacuumPwr,") != std::string::npos && line.find("Eco") == std::string::npos) {
                          id(vacuum_power).publish_state(line.substr(line.find(",")+1).c_str());
                      } else if (line.find("VacuumPwrEco") != std::string::npos) {
                          id(vacuum_power_eco).publish_state(line.substr(line.find(",")+1).c_str());
                      } else if (line.find("WallSensorType") != std::string::npos) {
                          id(wall_sensor_type).publish_state(line.substr(line.find(",")+1).c_str());
                      } else if (line.find("WheelPodType") != std::string::npos) {
                          id(wheel_pod_type).publish_state(line.substr(line.find(",")+1).c_str());
                      } else if (line.rfind("FuelPercent,", 0) == 0) {
                          id(neato_battery_voltage).publish_state(line.substr(13));
                      }
                  }

                  start = pos + 1;
              }

              buffer = "";  // leegmaken na verwerken
          }

  - interval: 10s
    then:
      - uart.write: "GetCharger\n"

  - interval: 30s
    then:
      - uart.write: "GetVersion\n"

script:
  - id: boot_actions
    then:
      - uart.write: "GetVersion\n"
      - uart.write: "GetCharger\n"
Connecting the ESP to the Neato
Once the ESP is running, you can connect it to the Neato as described earlier. If any updates are needed, these can be applied via OTA (Over-the-Air).
Turn on the Neato and check your ESPHome dashboard to see if the ESP comes online. If it does, open the log to verify that data is being received correctly.
Once the connection is confirmed and data is flowing, we can proceed to configure Home Assistant.
Final Step: Configure Home Assistant
Now we can configure Home Assistant to control the Neato.
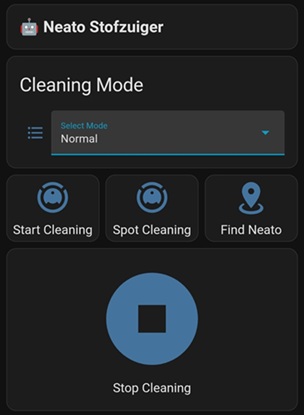
- Create a new empty dashboard in Home Assistant. You can name it Neato or any name you prefer.
- Open the newly created dashboard, then click on “Add a new view” or select an existing view where you want to add the Neato controls.
- Within the view, create a new card. Scroll down and select “Manual”.
- Paste the code provided below into the manual card editor.
⚠️ One important note: you may need to manually connect the entity IDs to the buttons in the card to ensure each control works correctly.
type: vertical-stack
cards:
  - type: markdown
    content: |
      ## 🤖 Neato Stofzuiger
  - type: entities
    title: Cleaning Mode
    entities:
      - entity: select.neato_cleaning_mode
        name: Select Mode
  - type: horizontal-stack
    cards:
      - type: button
        entity: button.neato_start_cleaning
        name: Start Cleaning
        icon: mdi:robot-vacuum
        show_state: false
        tap_action:
          action: call-service
          service: button.press
          service_data:
            entity_id: button.neato_start_cleaning
      - type: button
        entity: button.neato_spot_cleaning
        name: Spot Cleaning
        icon: mdi:robot-vacuum
        show_state: false
        tap_action:
          action: call-service
          service: button.press
          service_data:
            entity_id: button.neato_spot_cleaning
      - type: button
        entity: button.neato_find_neato
        name: Find Neato
        icon: mdi:map-marker-radius
        show_state: false
        tap_action:
          action: call-service
          service: button.press
          service_data:
            entity_id: button.neato_find_neato
  - type: horizontal-stack
    cards:
      - type: button
        entity: button.neato_stop_cleaning
        name: Stop Cleaning
        icon: mdi:stop-circle
        show_state: false
        tap_action:
          action: call-service
          service: button.press
          service_data:
            entity_id: button.neato_stop_cleaning
This project is built using ESPHome and integrates seamlessly with Home Assistant.
⚠️ Use this project at your own risk. The author is not responsible for any damage to your Neato or connected devices.